How to Download All Your NotebookLM Sources at Once (Bulk Export)
Enhance your NotebookLM experience with our free browser extension.
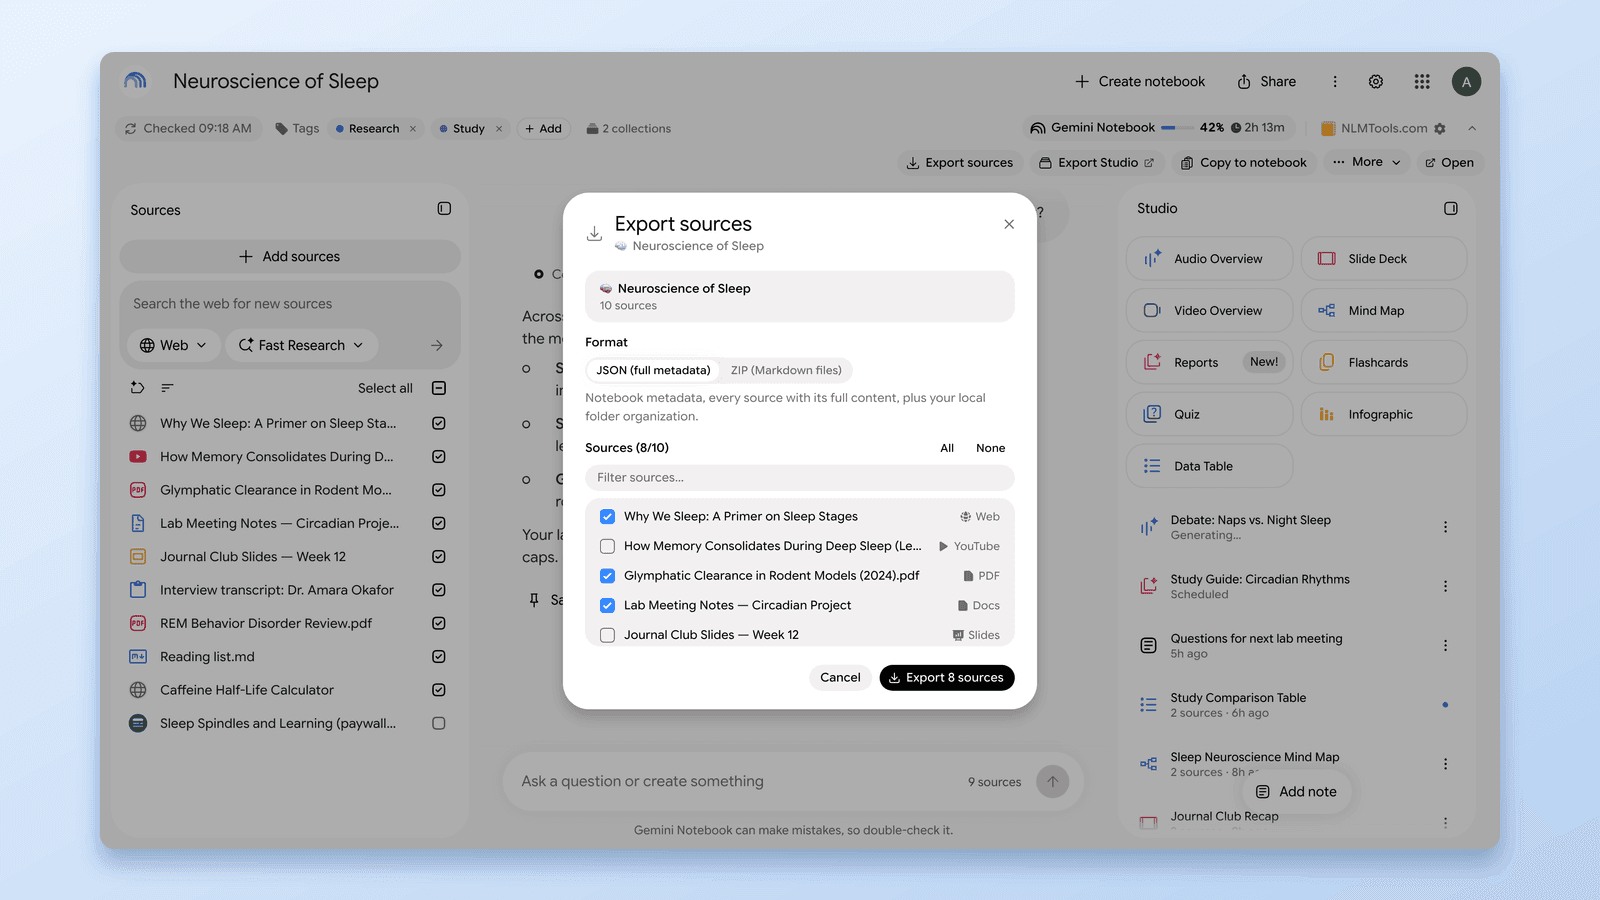
View plansShort answer: NotebookLM (now Gemini Notebook) does not include a native "export sources" button. The NotebookLM Tools Chrome extension adds a per-notebook export right on the notebook page — click Export sources on its toolbar and download the notebook's source list, content, and folder structure as a JSON or ZIP file you can archive, share, or re-import into another notebook.
Why You'd Export NotebookLM Sources
Common reasons:
- Backup before deleting. Google NotebookLM has no trash or undo for deleted sources — a removed source is gone. Exporting keeps a record before you clean up.
- Share a source list. Your collaborators don't need the full notebook — just the list of references. Export and share the file.
- Archive finished research. Completed project? Export the sources as a record, even if you later archive the notebook itself.
- Move between notebooks or accounts. Export from one notebook, import into another — much faster than re-adding sources one by one. If you want a full copy of a notebook rather than just its sources, see how to duplicate a NotebookLM notebook.
- External tools. Feed the source list into a citation manager, reading tracker, or documentation system.
What NotebookLM Exports Natively
As of April 2026, Google NotebookLM has:
- No "export sources" button on individual notebooks.
- No bulk download of source content.
- Studio outputs export one at a time from the Studio panel: Audio Overviews (Help) and mind maps (Help) have a Download option, and reports go to Google Docs with Export to Docs (Help) — last verified 28 September 2026.
- Chat history cannot be exported.
Individual Google Drive sources can still be downloaded from Drive directly, since NotebookLM references them there. But NotebookLM itself doesn't package them for you.
How NotebookLM Tools Exports Sources
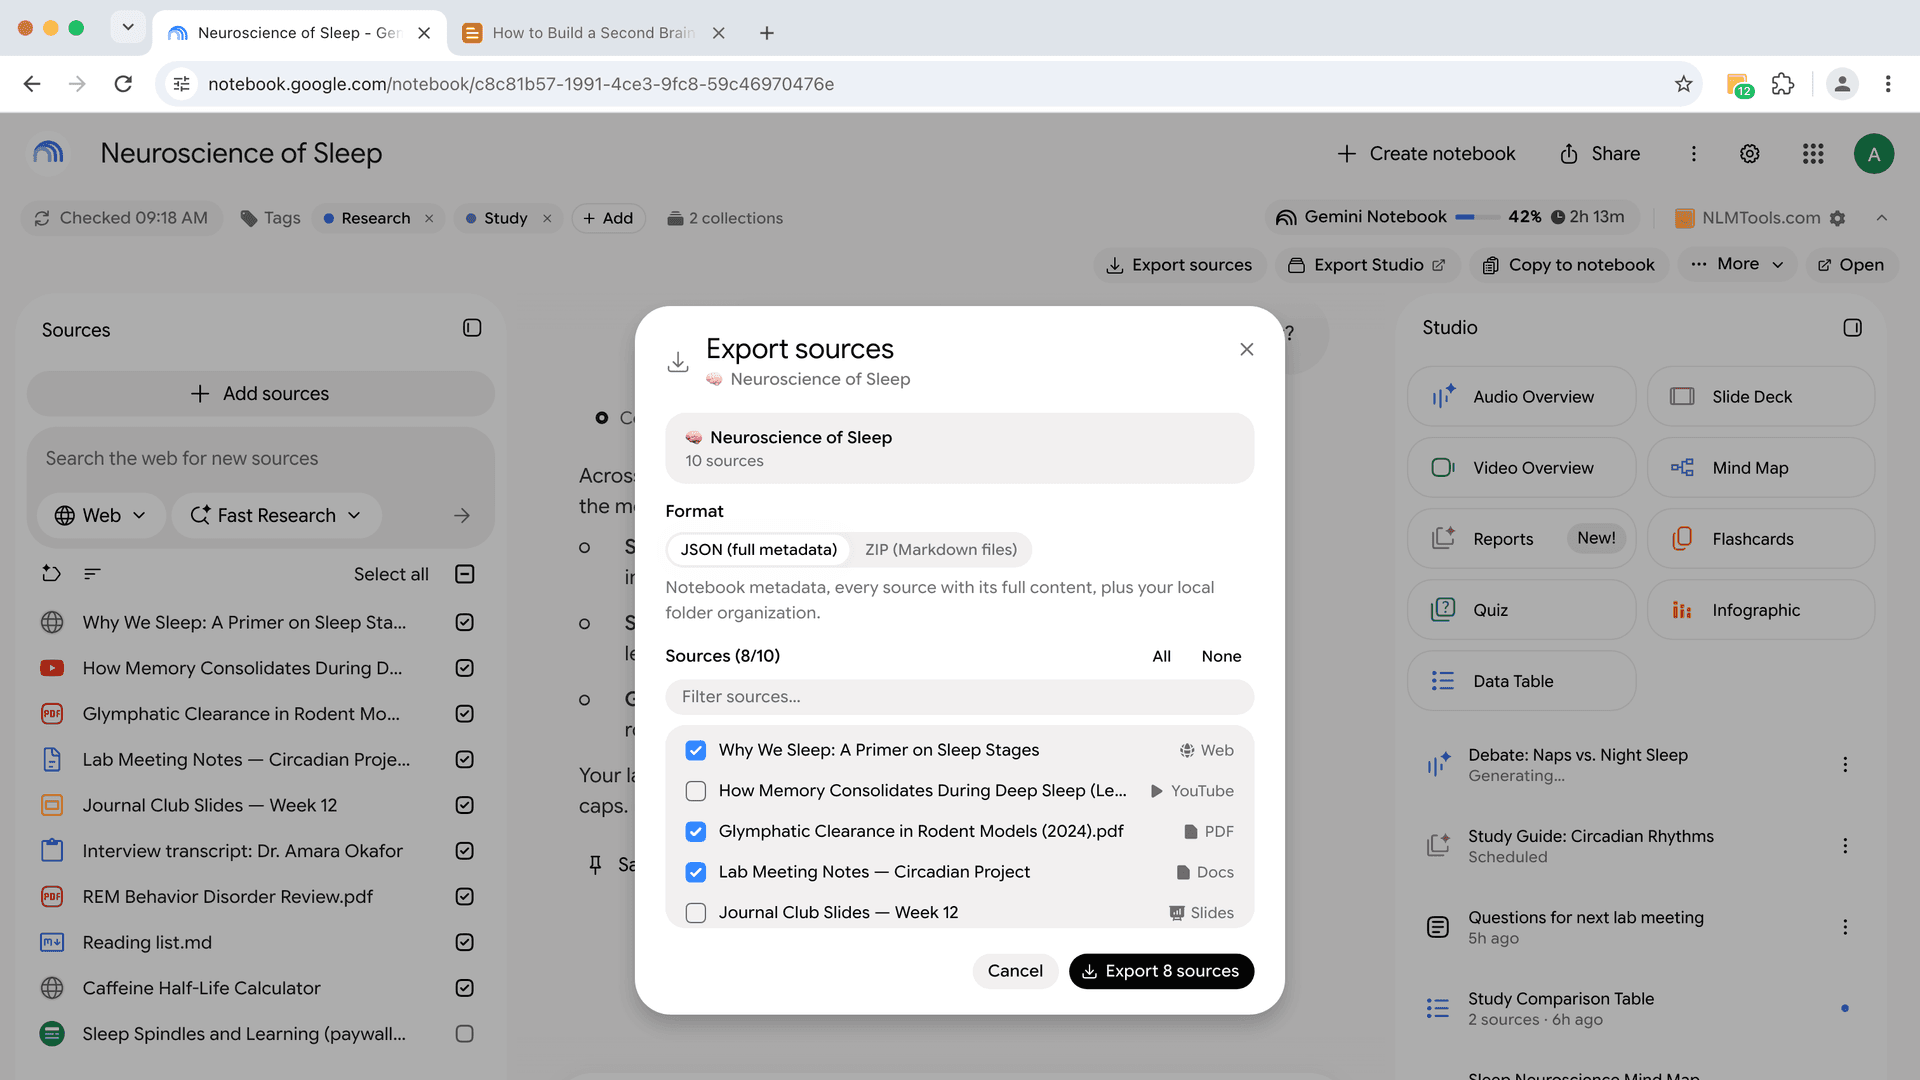
Open a notebook on notebook.google.com and the extension adds a toolbar to the page — Export sources · Export Studio · Copy to notebook · More · Open. Click Export sources: a panel opens on the page with every source ticked (use All / None to adjust), pick ZIP or JSON, click Export, and the file lands in your browser downloads. The same export also lives on the extension's own notebook page as Backup/Restore. The JSON export contains:
- Notebook title and emoji
- Each source's title, URL, and source type (PDF, web, YouTube, Google Doc, etc.)
- Source content where the NotebookLM API returns it (for example, parsed Drive docs and web pages)
- The folder structure within that notebook (if you're using source folders)
The ZIP export writes each source to its own Markdown file ({index}-{title}.md) with the URL as a blockquote header, followed by the source content.
This works on any notebook you can open — including public or link-shared notebooks that aren't in your library. The toolbar shows a "Not in your library" chip on those and the export runs read-only, so it's also the quickest way to save a public notebook's sources.
What's Exported vs. What Isn't
Exported:
- The source list with titles, URLs, and source types.
- The source content the NotebookLM API returns for each source.
- The folder structure within the exported notebook.
Not exported:
- The original uploaded files (PDF, DOCX). The export carries the parsed text content, not the binary file.
- Chat history — NotebookLM has no chat export of its own.
- Audio overviews, mind maps, or other Studio outputs — see How to Download NotebookLM Audio & Video Overviews for those.
- Tags, saved prompts, and extension preferences. Those live in a separate settings backup accessible from the Backup page.
This export runs per-notebook. If you want to back up tags, saved prompts, source folders across all notebooks, and extension preferences, use the separate settings backup from the Backup page.
Importing Back
The JSON export can be re-imported into any notebook:
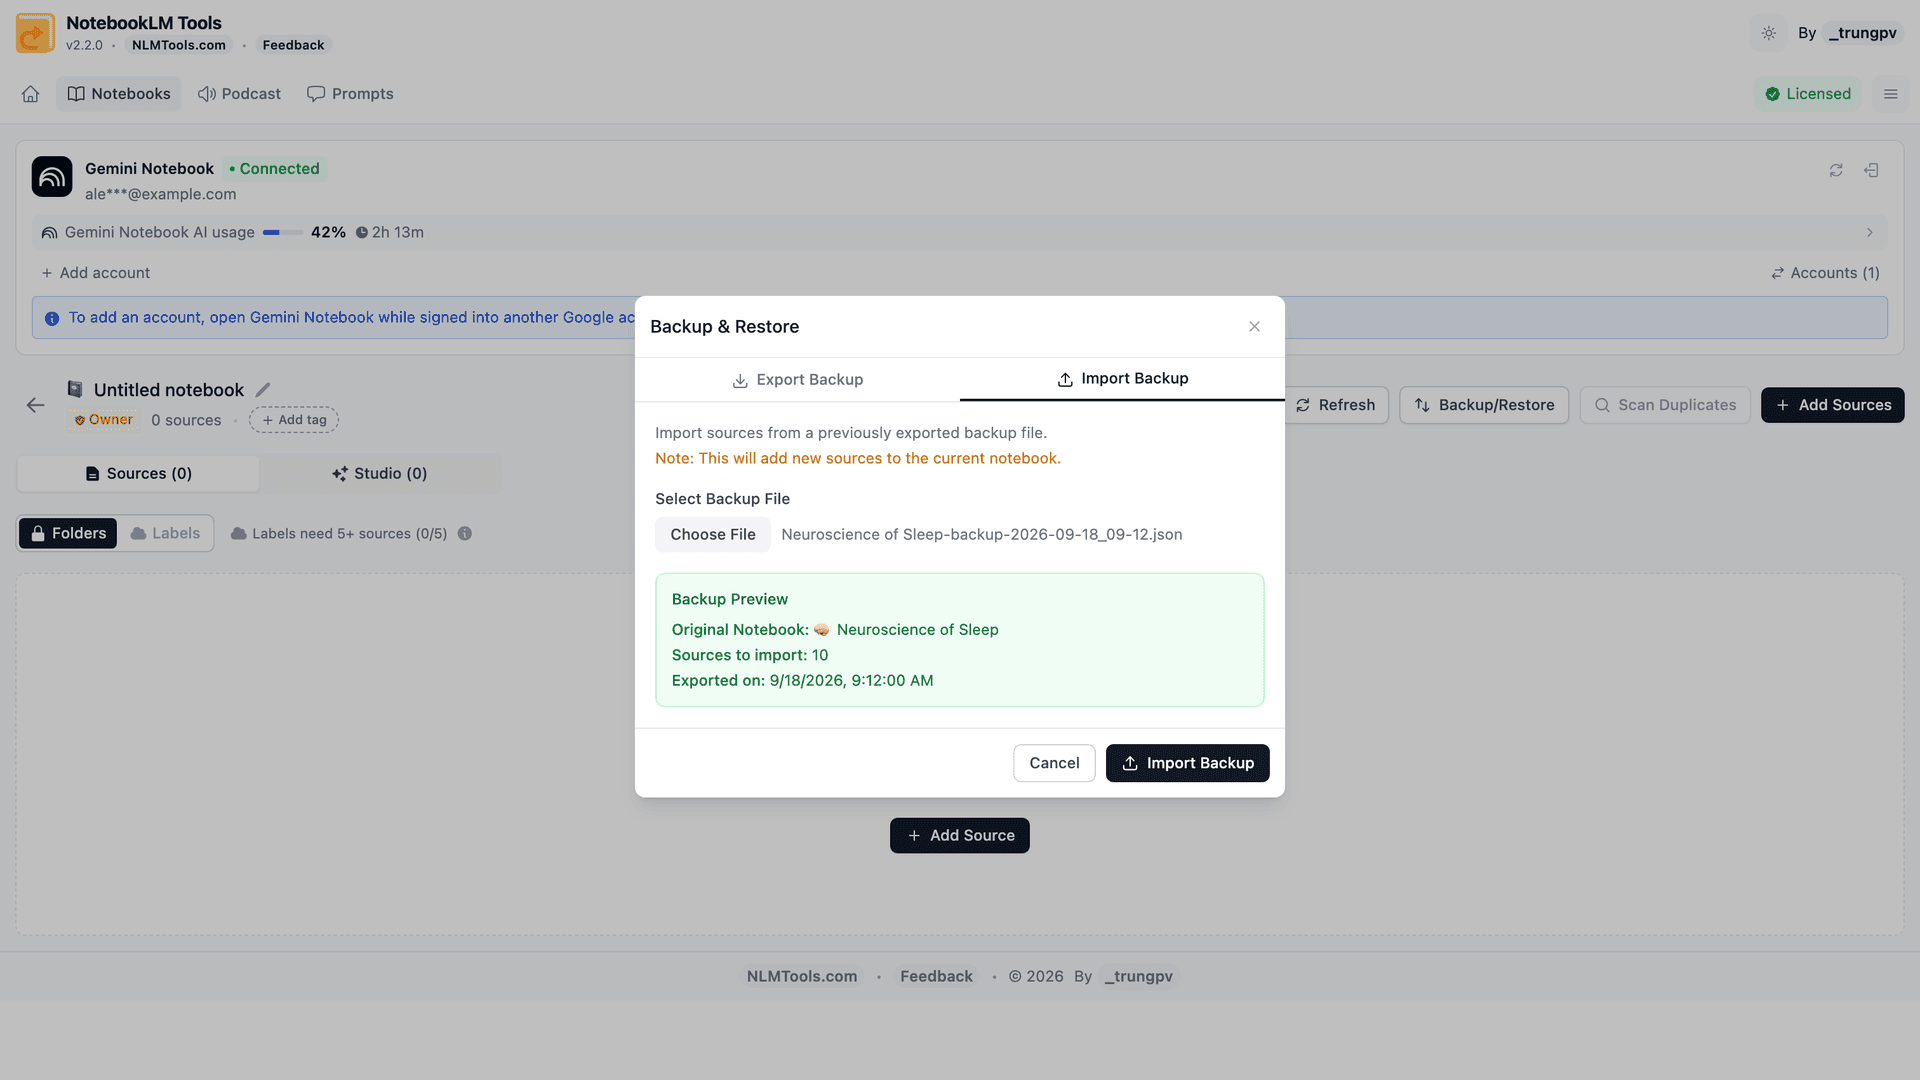
- Open the destination notebook in NotebookLM Tools — on the notebook page, click Open on the toolbar.
- Click Backup/Restore and switch to the Import Backup tab.
- Pick the JSON (or ZIP) file.
- Check the preview — for JSON it shows the original notebook's title, the number of sources to import, and when the file was exported.
- Click Import Backup. The extension adds the sources to the notebook a few at a time and, for a JSON backup, puts them back in their source folders.
Restored sources come back as text. A JSON import adds each source as a new text source with its title, its original URL at the top, and its full text (a source whose text wasn't captured is re-added from its URL instead); a ZIP import adds each Markdown file as a text source named after the file, without the URL line. So Google Drive docs, web pages, and YouTube videos return as text copies rather than live links — re-add them from Drive or by URL if you need them to stay in sync. An uploaded PDF's text comes back without re-uploading, but the original PDF file isn't in the backup.
Export in Other Languages
- Spanish (
descargar fuentes de NotebookLM): el proceso es el mismo — instala NotebookLM Tools, abre Backup & Restore y exporta como JSON o ZIP. - Japanese (
NotebookLM ソース エクスポート): 手順は同じです — NotebookLM Toolsをインストールし、Backup & RestoreからJSONまたはZIPとしてエクスポートします。 - Korean (
NotebookLM 소스 다운로드): 동일한 방법 — NotebookLM Tools를 설치하고 Backup & Restore에서 JSON 또는 ZIP으로 내보냅니다。 - German (
NotebookLM Quellen exportieren): Gleicher Ablauf — NotebookLM Tools installieren, Backup & Restore öffnen und als JSON oder ZIP exportieren.
Tips for Cleaner Exports
Name your sources before exporting. NotebookLM auto-names some sources based on file name or URL. If "Untitled.pdf" and "document-v2.pdf" aren't descriptive enough, rename them in NotebookLM first — the export will use whatever title is current.
Export a subset when you only need part of a notebook. The Export sources panel starts with everything selected — click None, then tick just the sources you want. Folders aren't a filter, but the JSON export records which folder each source sits in, so you can still tell sub-topics apart after the fact.
Re-export after big changes. The export is a snapshot, not a live sync. If you add 20 sources next week, re-export to keep the backup current.
Version your backups. Save exports with a date in the filename (my-research-2026-04-17.json) so you can restore to a specific point in time.
Frequently Asked Questions
Can I export all my notebooks at once?
Yes. On the extension's Notebooks page, tick the notebooks you want, click Export, and choose JSON or ZIP — one file holds every selected notebook's sources (in a ZIP, each notebook gets its own folder). Export sources on the notebook toolbar exports one notebook at a time. A separate settings backup (from the Backup page) covers your tags, saved prompts, all source folders, and extension preferences in one file.
Does the export include the full PDF content?
It includes the PDF's text, not the PDF file. The export carries the text NotebookLM extracted from each source, plus its title and URL (and, in JSON, its type and folder), so the words come back when you re-import. Layout and images stay in the original file — keep your own copy, or download it from Google Drive if that's where it came from.
Can I export NotebookLM chat history?
Not with NotebookLM Tools, and NotebookLM has no chat export of its own: chat history stays in the notebook, private to you. To keep an answer, select Save to note on that response (Google Help, last verified 28 September 2026) — notes are included when you download the notebook's Studio items through Export Studio. Some third-party extensions also export the chat itself.
What format is the export?
JSON or ZIP — JSON is human-readable and works in any text editor; ZIP bundles everything into a single archive. Pick whichever fits your workflow.
Is exporting free?
Yes. Backup & Restore is part of the free feature set. See pricing for what the optional Pro license adds.
Can I export to CSV or PDF instead of JSON?
The source export is JSON and ZIP only. If you want individual parts of a notebook as a PDF — slide decks, reports, or notes — see How to Export NotebookLM to PDF. If CSV export would help your workflow, submit a feature request.
Wrap-up
The export takes about a minute and gives you a portable copy of your source list — useful before any major cleanup, when handing a reference list to a collaborator, or as a recovery checkpoint. NotebookLM Tools handles it. See the backup and restore feature for the full workflow.
Related articles:
- NotebookLM Tips #6: Backup and Restore — Full backup workflow, including restore.
- How to Duplicate or Copy a NotebookLM Notebook — Use export/import to clone an entire notebook.
- Can You Merge or Combine Notebooks in NotebookLM? — Use export to move sources between notebooks.
- How to Import Sources into NotebookLM (Every Method) — The import flow export data slots back into.
- How to Auto-Update & Refresh NotebookLM Sources in Bulk — Refresh exported sources when originals change.
- How to Download NotebookLM Audio & Video Overviews (MP3, MP4) — Export studio output — audio, video, slides — not just sources.
- How to Export NotebookLM to PDF — Turn slide decks, reports, and notes into PDF files.
Trusted by 90,000+ NotebookLM users
Related articles
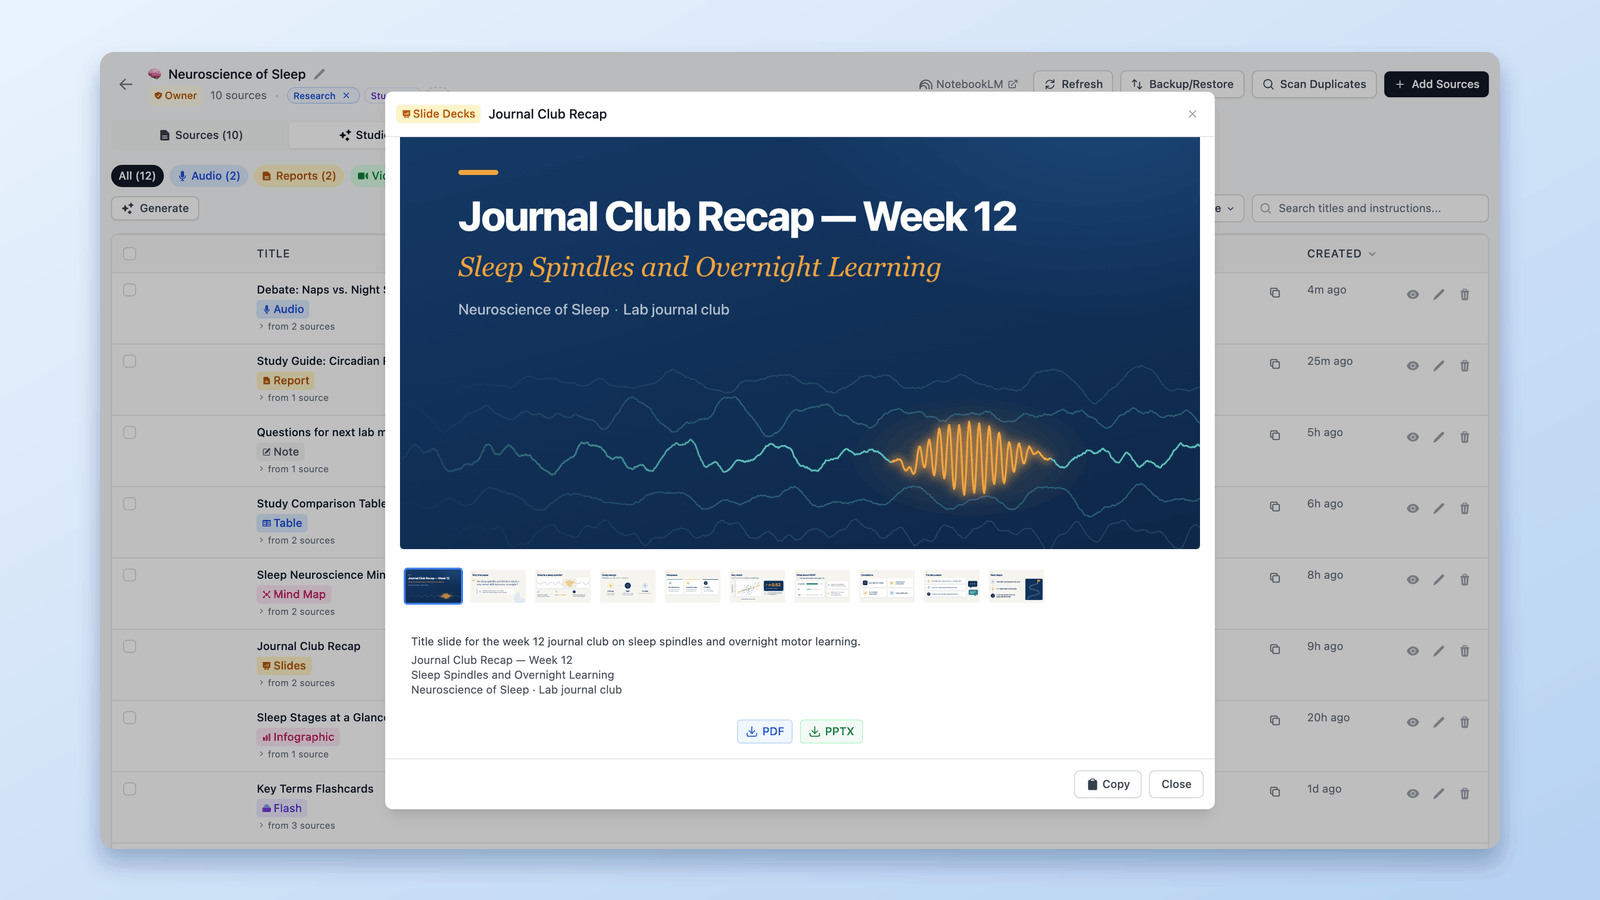
How to Export NotebookLM to PDF (Sources, Notes & Studio)
Yes. Slide decks download as PDF, chat can create one on some plans, and the free NotebookLM Tools Print / PDF button covers notes, reports, quizzes, and sources.
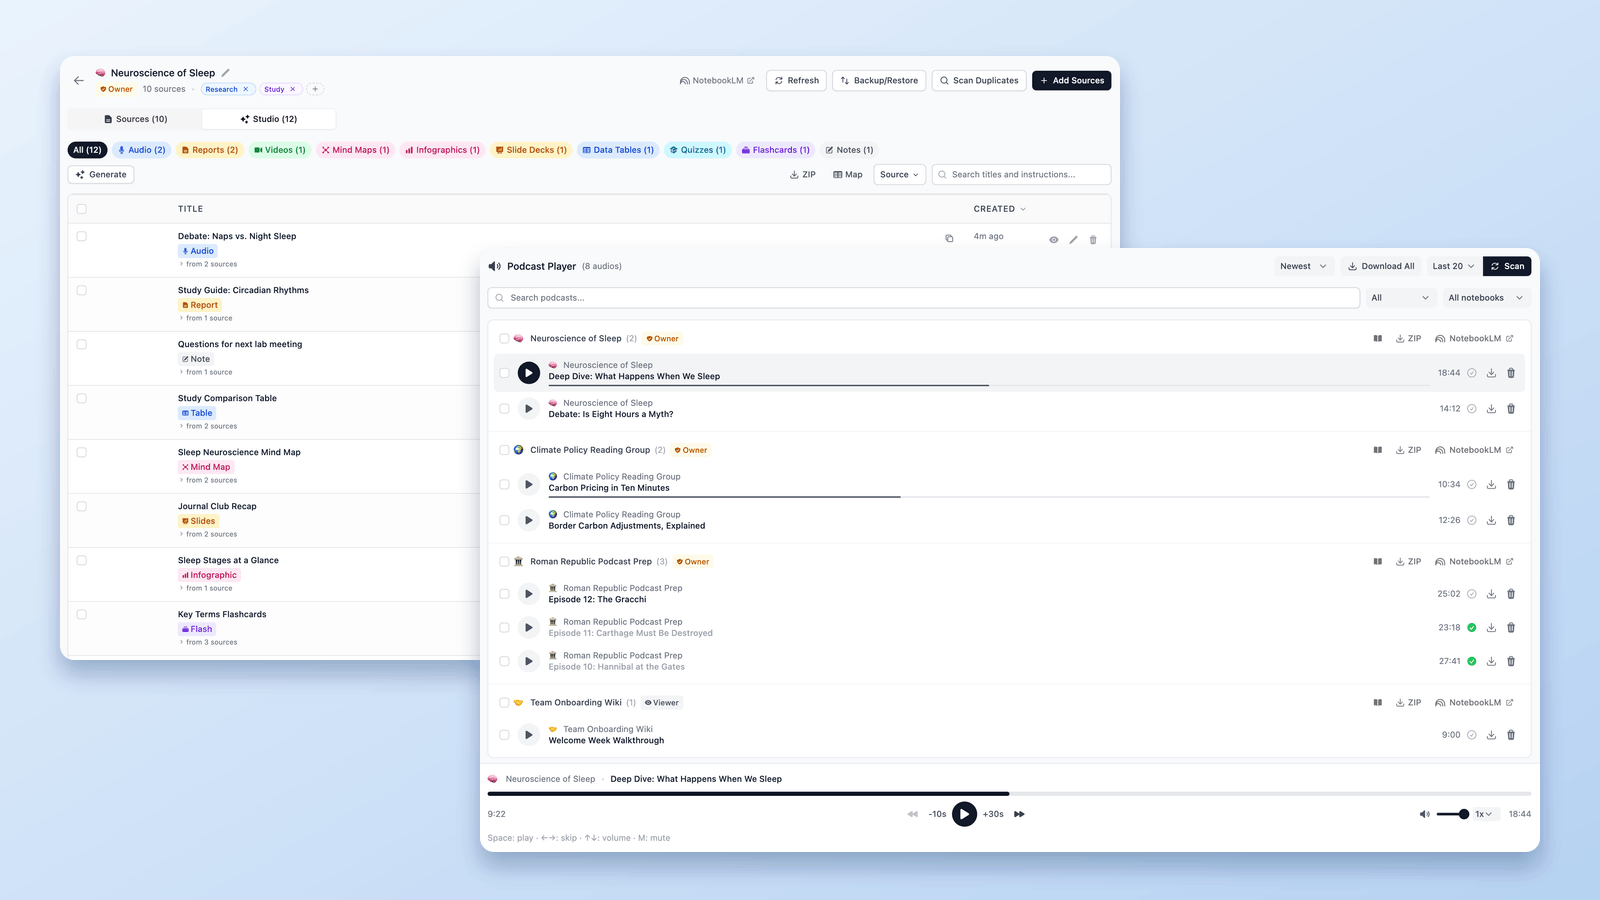
How to Download NotebookLM Audio & Video Overviews (MP3, MP4)
The NotebookLM downloader guide: save Audio Overviews as MP3 — one at a time or all at once as ZIP — download Video Overviews as MP4, free, by link or in bulk.
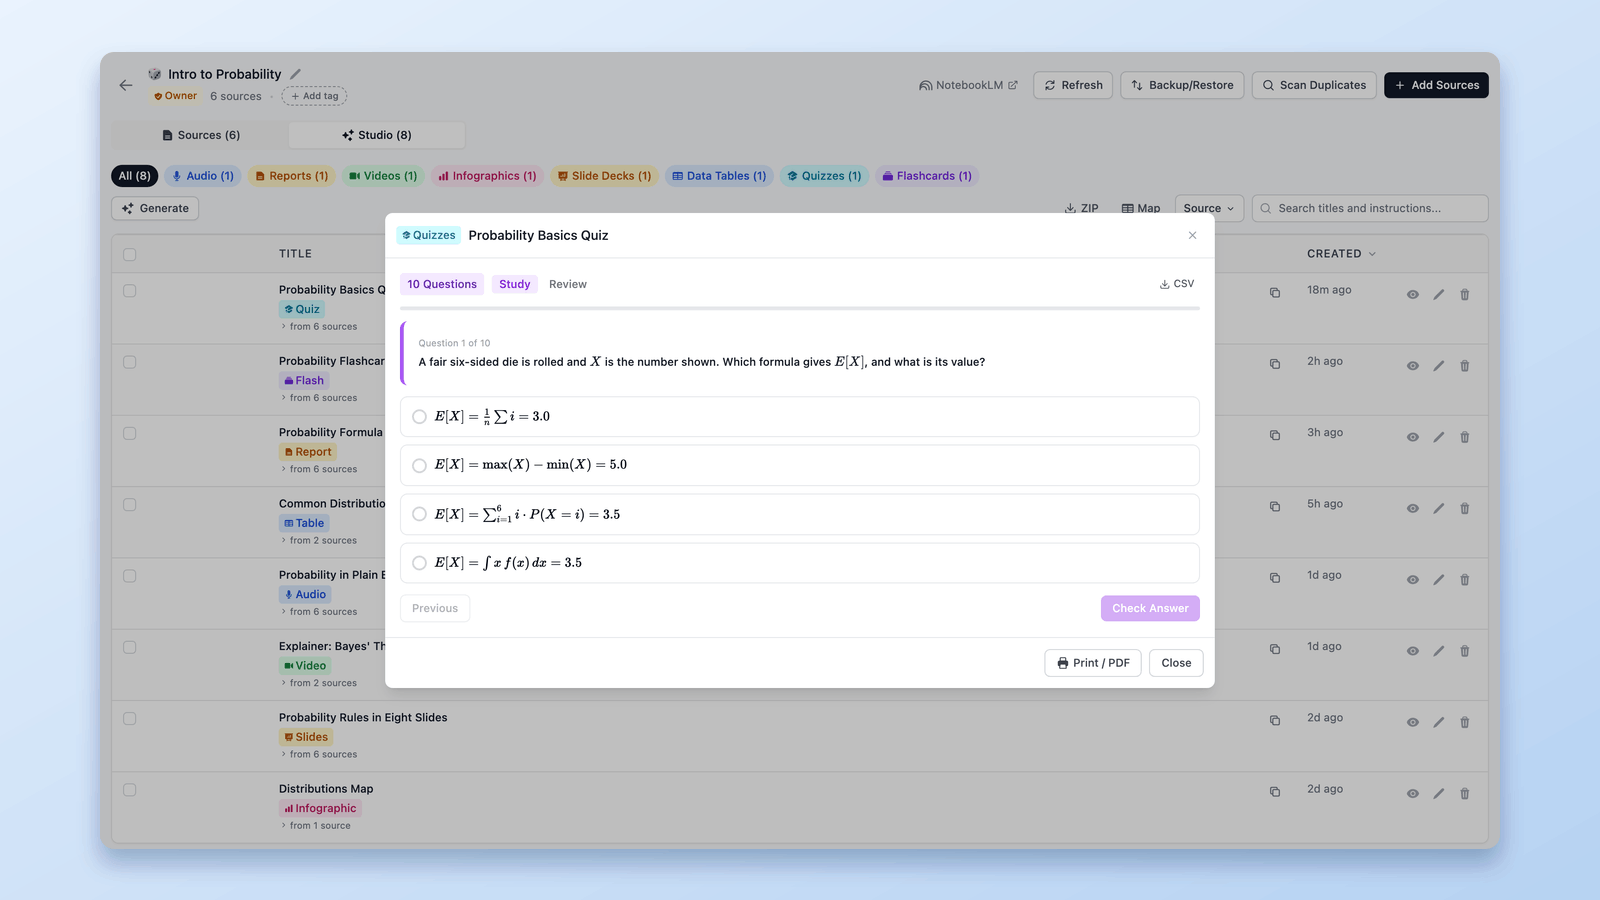
How to Export a NotebookLM Quiz (Spreadsheet, PDF, Answer Key)
Google documents no NotebookLM quiz export. The free NotebookLM Tools extension saves quizzes as CSV, prints them with an answer key, and sends flashcards to Anki.